
Adjusting Steering Bearings


Proper adjustment ensures longer bearing life and a straighter ride.
In the previous issue, we covered how to replace steering head bearings. Whether the bearings are new or not, they will still need occasional adjusting, and their correct adjustment is critical, as it can have a detrimental effect on the handling of your motorcycle. If they are too loose, they will cause an annoying knocking sound every time you hit a bump or hit the brakes, though this won’t really affect the way your bike steers. If they are too tight, however, they will introduce resistance into the steering system and cause the bike to weave at high speeds and wander from side to side at low speeds, which is both unnerving and potentially dangerous. And, of course, either of these conditions will also cause the bearings to wear prematurely.
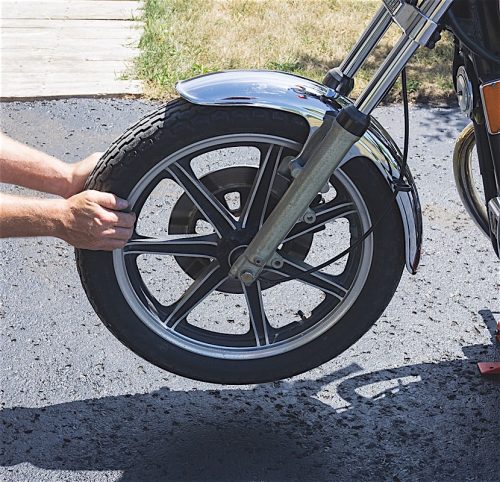 First, here’s a recap of how to check if the bearings are properly adjusted. To check, you must prop the motorcycle upright and raise the front wheel off the ground. This is easy to do if the bike has a centre stand; if not, you’ll have to devise a way to do it safely. With the front wheel off the ground and centred, grab the forks at the very bottom and pull and push on them evenly. Any knocking you feel as you do this means they are loose. You can confirm this if you have a helper. Have your assistant push and pull on the forks while you place a finger at the bottom bearing, right where the triple clamp meets the steering head, where you can physically feel for any free play.
If there’s no free play or knocking, turn the fork from side to side. You should feel no resistance while doing this; if you do, the bearings are too tight. You may have to remove cables from the handlebar to do this, as they may introduce some resistance into the steering that could lead to an incorrect assessment. If there’s no resistance and no looseness in the steering bearing, you’re ready to go for a ride. Otherwise, it’s time to get your tools.
With the front end still propped up, the first step to adjust the bearings is to loosen the top triple clamp nut, followed by the top fork pinch bolts. Note that some bikes have a bolt at the centre of the clamp and a third pinch bolt that tightens onto the steering stem; all of these have to be loosened. These bolts must be loose because as you turn the adjusting nut located beneath the top clamp, you must allow for the clamp to move freely; otherwise, it will bind when everything is tightened up. Also note that on some bikes it will be necessary to remove the top clamp altogether to gain access to the adjusting nut, or there might be a locknut on the adjusting nut that will need to be loosened before any adjustment is made. As with any important maintenance procedure, a service manual can provide all the details of your particular model.
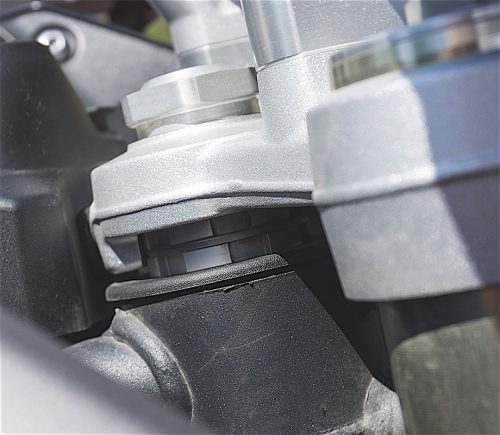 To turn the adjusting nut, you’ll need a hammer and a drift punch – the latter preferably made from aluminum so as not to mar the nut’s notches. I fashioned one from an aluminum nail. An alternative, if there’s enough room for it, is a shock absorber spanner wrench. If the fork is too tight, turn the adjusting nut counter-clockwise one-eighth at a time until you just begin to feel the knocking that indicates a too-loose condition, then tighten it back up one-eighth of a turn. If they are too loose, turn the nut clockwise in one-eighth increments until the knock is gone.
Some bikes have a specific torque for the adjusting nut, but you’ll need a specialized socket for this; some manufacturers require a specific amount of resistance at the end of the handlebar, measured with a spring scale – a first-generation Suzuki SV650, for instance, requires 200 to 500 grams of tension before the handlebar moves. The method described above is a general procedure that works on all bikes.
Harley touring bikes have forks that self-centre thanks to their steering geometry. The procedure to adjust those is more involved, as anything that might prevent the forks from moving freely must be removed. The front wheel has to be raised with the bike level, and you need to count how many swings it takes for the fork to centre itself from full lock: fewer than three swings and the fork is too tight; more than three and it’s too loose.
Once you’re done with the adjustment, tighten the top nut to its specified torque and recheck the bearings, as this might have changed the adjustment. Once you’re satisfied with your adjustment, re-torque the fork pinch bolts and replace anything you removed. You should check your steering bearings annually.
Technical articles are written purely as reference only and your motorcycle may require different procedures. You should be mechanically inclined to carry out your own maintenance and we recommend you contact your mechanic prior to performing any type of work on your bike.


Thanks for Reading
If you don’t already subscribe to Motorcycle Mojo we ask that you seriously think about it. We are Canada’s last mainstream motorcycle magazine that continuously provides a print and digital issue on a regular basis.
We offer exclusive content created by riders, for riders.
Our editorial staff consists of experienced industry veterans that produce trusted and respected coverage for readers from every walk of life.
Motorcycle Mojo Magazine is an award winning publication that provides premium content guaranteed to be of interest to every motorcycle enthusiast. Whether you prefer cruisers or adventure-touring, vintage or the latest models; riding round the world or just to work, Motorcycle Mojo covers every aspect of the motorcycle experience. Each issue of Motorcycle Mojo contains tests of new models, feature travel stories, compelling human interest articles, technical exposés, product reviews, as well as unique perspectives by regular columnists on safety or just everyday situations that may be stressful at the time but turn into fabulous campfire stories.
Thanks for considering a subscription. The Mojo team truly appreciates it.
